We disassemble the samsung washing machine. How to remove the front wall of a Bosch washing machine
Washing machine failure is a serious problem. To establish the causes of the breakdown and identify the faulty unit, it is necessary to take exceptionally competent actions. For example, it is important to understand how to disassemble a washing machine, following a certain sequence of actions. If the order of dismantling the body and internal parts is violated, damage can be caused, as a result of which additional parts will have to be replaced.
The order in which the work is carried out depends on the loading method - frontal or vertical. In some cases, it may be enough to remove back panel machine and gain access to the most frequently damaged parts, for example, heating elements or parts of the drum subject to increased wear. Experts strongly advise before starting work to carefully study electrical circuit, thoroughly familiarize yourself with the device of the machine. And only after that, start the repair work with your own hands.
Before disassembling the machine, you must:
- carefully study the instructions;
- select the appropriate tools;
- disconnect the machine from the power supply and the water supply system, and the drain hose from the outlet to the sewer.
Removing the control panel is one of the most critical stages of disassembling the machine.
Washing machine dismantling tools:
- service hook;
- wrenches 8, 9, 19;
- flat screwdriver;
- Phillips screwdriver;
- pliers, nippers designed for self-clamping clamps;
- ordinary nippers;
- insulated pliers;
- long bent pliers.
IMPORTANT TO KNOW: Most of the body parts of the washing machine are made of plastic. They work with them very carefully so as not to damage the material and prevent cracks.
 Complete dismantling of the drum is required when replacing the bearing
How to disassemble a front-loading machine
The procedure for disassembling washing machines from different manufacturers has its own characteristics. However, there is general principles, almost identical for most washing machines:
- Removing the top panel. Use a Phillips screwdriver to unscrew the fasteners, and then carefully pull the cover towards you and remove it. Be extremely careful not to damage the elements.
- Removing the detergent drawer. To release it, you need to press your finger on the special area in the central compartment of the tray. After that, the container is easily pulled out.
- Dismantling the control unit. Unscrew the screws at the top of the front panel, carefully unscrew the block 90 degrees and carefully remove it from the fastening mechanisms. The panel is attached to the side of the machine using a service hook. In some cases, you need to disconnect the connectors with wires. They are simply removed from the corresponding grooves in the control unit.
- Removing the service panel (located at the bottom of the front of the machine). Unscrew the screws extending to the sides, then remove the panel, gently prying it with a flat screwdriver.
- Separating the rubber cuff from the center panel. The clamp is pry off with a screwdriver, released from the grooves.
- Removing the central panel. Unscrew 4 screws with which it is attached to the body and dismantle this part of the body.
- Disconnect the sunroof lock connector.
- If necessary, remove the rear panel by unscrewing the corresponding fastening screws and the drum tightening bolt.
IMPORTANT TO KNOW: The washing machine is assembled in the reverse order.
 Removing the top panel allows access to the electrical part of the control system
How to disassemble a top-loading machine
Disassembling and repairing vertical washing machines is a rather laborious operation. Unfortunately, these models have many typical malfunctions, such as spontaneous drum opening, corrosion of the metal block, rapid imbalance of the drum during washing. But the most common problem with vertical washing machines is bearing failure. And in this case, the technique must be disassembled.
Dismantling a top-loading washing machine begins with dismantling the control panel:
- Unscrew the fixing screws from the side.
- Move the block towards you.
- Disconnect the wires.
- Take out the panel.
- it is necessary to remove the detergent dispenser,
- dismantle the top and side panels,
- release the drum by removing the clamp.
- the plastic casing that covers the inner tank must be removed with extreme care and jewelry so as not to damage it.
- it is necessary to clearly remember the location of each wire and internal element and, during the subsequent reassembly, assemble it exactly as it was. Otherwise, the least that can happen is that the washing machine will not work. And in extreme cases, you can get a short circuit and, as a result, burned out equipment.
Due to the design features of machines with vertical loading of linen, disassembling the body and disassembling parts will require considerable effort, attention and perseverance. In principle, the same applies to front-loading machines - without special skills, it is unlikely that it will be possible to quickly and accurately achieve the desired result.
 To gain access to the electric motor and the back of the drum, remove the rear panel of the machine
Video: DIY washing machine repair
Regardless of the complexity, do not be afraid to repair the washing machine yourself. Now the network has a lot of information and video tutorials that detail how to disassemble a washing machine. According to experienced craftsmen, all modern machines are similar to each other, and their main problems are also typical. In this article, we will cover in detail the issue of disassembling such a technique.
Cooking tools
All washers have a similar design and operating conditions. Assemble the tools before disassembling the unit. There is such a set in every home.
So, you need to acquire:
- Phillips screwdriver;
- Slotted screwdriver;
- Wrenches of different sizes;
- With a hammer;
- Pliers, simple and bent;
- Pliers and wire cutters.
Important! Before starting work, disconnect the household appliance from the water and power supply. All instruments must be insulated.
We disassemble the washing machine
When disassembling the Indesit washing machine, as with other brands, it is necessary to photograph each step. Thus, it will remain step-by-step instruction, thanks to which the unit can then be reassembled.
Procedure:
- Remove the cover. To do this, you need to unscrew two bolts from the back, for which a Phillips screwdriver is used. The cover is then pushed a little from the front and removed.
- To remove the dispenser, press a point in the center of the tray and then pull it out.
- To remove the control panel, you need to unscrew the screws that fix it. Then the panel is neatly separated and neatly placed on the top of the washer so that it does not interfere with further work.
- To remove the bottom panel, unscrew the mounting bolts. Then the rubber cuff of the hatch is removed, for which the door is opened and the fixing clamp is removed. To do this, use pliers, a screwdriver or round nose pliers.
- After removing the cuff, unscrew the bolts that secure the hatch lock. After removing all the fixing elements, the front wall of the washing machine is removed.
- To disconnect the inlet hose suitable for the tank, remove the retaining clip. For this, pliers are used. The hose can now be removed freely.
- To remove the hose leading to the pressure switch, you must also first remove the clamp.
- We get rid of the inner clamp that fixes the rubber cuffs on the washer tank. The collar is removed, the screws fixing the rear wall of the unit are unscrewed, and it is also removed.
- The counterweights to be removed in the next step can be located at both the front and rear of the instrument. They are visually similar to concrete blocks. Their purpose is to eliminate strong vibration of the machine during spinning and other washing processes. They are attached with long bolts that must be twisted and the counterweights removed.
- Most often, the heating element is located at the back of the car, at the bottom. In order to remove it, it is necessary to get rid of the retaining nut. Its location is in the center. Then the stud with which the nut was twisted is pressed and pushed inward. In the event that you cannot do this with your hands, you can use a hammer. The main thing is not to overdo it. Then the heating element must be slightly pry off with a flat object and carefully removed.
- A drive belt connects the motor and a pulley attached to the tank. Before removing it, you need to remove the interfering wires and remove the fixing elements.
- The tank remained suspended by springs, and shock absorbers fix it from below. The shock absorbers must be twisted, the springs must be carefully removed and the tank removed.
- In the event that disassembly of the tank is required, there is nothing complicated in this process. First, you need to twist the bolt that secures the pulley. Then it is necessary to remove the pulley itself and press the shaft into the tank. Then you need to remove the clamp and the tank is divided into two parts.
Important! In some models, the tanks may be non-collapsible. Sometimes they are sawn and then reassembled using bolts and waterproof sealant.
We learned how to disassemble the Indesit washing machine. As it turned out, there is nothing complicated in this process. Even a non-professional will take about three to four hours to do this.

Typical malfunctions
Thanks to washing machine the hostess can significantly save time and effort. If suddenly it doesn't work, life turns into uncomfortable. But not in every case it is necessary to completely disassemble the washing machine. Some breakdowns are easier to fix.
There are malfunctions that appear as follows:
- Water does not heat up. Most often, the heating element is to blame for such a malfunction. Much less often, the reason is an open circuit in the power supply. And very rarely this happens due to faulty sensors or a malfunction of the control unit.
- No water inflow. For water to flow normally, normal pressure is required. In its absence, there is no water. This often happens when the water tap is closed and connected to the machine. If some time has passed since the start of washing, then this signals a clogged one.
- As soon as the machine has collected water, it immediately drains it. This can happen due to the fact that the device is not properly connected to the sewer. Self-draining may not appear immediately, but only some time after the start of operation. Another reason is a serious internal breakdown, due to which program control is disrupted.
- The appearance of water under the car. If the curtains were washed before that, there is nothing to worry about, just in the process a large amount of foam was formed, which eventually leaked through the technical hole. Poor routing of the hose through which the water is supplied can also be called the reason. For the problem to disappear, it is enough to replace it.
- Water does not drain. Cleaning the drain pump filter is usually sufficient. If you repeat this procedure regularly, problems should not appear.
- The washer makes a lot of noise during operation. This symptom indicates a malfunction in the mechanism. There may be a foreign object in the tub, or the laundry is unevenly distributed in the drum. It is also possible that the machine itself is incorrectly installed or the bearings are faulty.
Important! Modern washing machines in case of malfunctions on the display show a set of letters and numbers. This is a technical error code. What do they mean? We have prepared separate reviews of the decoding of error codes from the most famous manufacturers and ways to eliminate them:

We change the heating element
The heating element suffers most often, so it is important to know how to replace it in the event of a breakdown. Most often, malfunctions occur due to increased water hardness, which leads to the formation of excess scale. In this case, you will definitely need to disassemble the washing machine.
How to replace the heating element:
- Communications are disconnected from the car: electricity and sewerage.
- We carry out a check for the presence of water in the mechanism. If present, it must be drained through the drain hose.
- Disconnect the wires leading to the heating element, which is usually located at the bottom of the machine.
- We dismantle the heating element, while acting very carefully. The location of the heating element should be cleaned of accumulated scale.
Important! In this case, the wires must be marked, otherwise, there may be problems with the reverse connection.
- We install a new heating element.

Important! As mentioned above, the quality of the water affects the operation of the washing machine and its service life, therefore, the equipment must be looked after from the day of purchase. We have prepared a separate post in which you will learn how to do it right.
Replacing the pump
Situations when you need to disconnect the pump are not so rare. In such a situation, such a disassembly of the washing machine will be required.
To fix the vast majority of faults with your own hands, you should know how the Indesit washing machine is disassembled.
If, after 5-7 years of operation, repairs are required, this is quite normal. The only question is who to entrust the repair of the SM: a good master, or try to fix everything on your own? In the article, we will look at how to remove the top and back cover of the Indesit washing machine, we will explain the sequence of disassembling the case.
Washing Indesit is not much different from a similar brand Ariston. But there are still differences in the process of disassembly and repair, while the tool will need almost the same. So, arm yourself with these devices:
- Spanners 8-18 mm.
- A set of heads and a crank.
- Pliers and pliers.
- Screwdrivers - slotted and Phillips. It may be more convenient to use one screwdriver (normal or electric) with a set of nozzles.
- A small set of socket wrenches.
- A multimeter.
- With a hammer.
- Saw-hacksaw (for metal).
- Markers.
- Shilom.
If you are not going to repair the electrical component of the machine, then the multimeter may not be needed. Take a regular tester - it might come in handy.

Now that you have all the necessary set of tools, you just need a clear disassembly diagram.
Set up your workplace. If the machine is in a miniature bathroom 1x1.5 m, then there will be nowhere to unfold the entire tool and turn around. Great if you have a garage or workshop. But if there is nothing of the kind, then transfer the machine to the kitchen or at least to the hallway. You will need at least 2 m 2 of free space.
In general, the preparation of the site for disassembling the Indesit machine is as follows:

Now that everything is ready, you can try to disassemble the Indesit washing machine with your own hands.
The first thing to do is remove the cover. It is fastened with two bolts from the side of the rear panel. Pick a suitable screwdriver and unscrew the fasteners, then pull the cover towards you a little and lift it up - that's it, the panel is dismantled.

The second step is to remove the cover from the back. The service hatch is fixed with six screws - unscrew them with a suitable screwdriver.

Having removed the interfering panels - the back and the top, you will see in front of you a part of the "insides" of the washing machine. Using them, you can access the tank.
Proceed to remove the drive belt:
- Grasp the pulley with one hand.
- Hold the strap with your other hand.
- Spin the pulley.
If everything is correct, the strap will slide off easily.

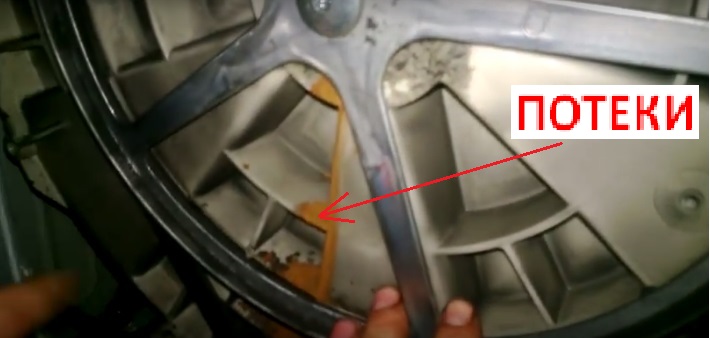
Examine the back wall behind the pulley. If you notice rusty oil stains or drips, the bearings are no longer usable and the Indesit washing machine must be disassembled to replace them.
Proceed like this:
- Find the heating element (its shank is visible under the tank). Remove all wiring from the heater contacts. Unscrew the nut located in the center of the shank between the contacts. Having loosened the element, remove it from the groove.
Important! Many leave the heating element in the tank, disassembling the washing machine. But this requires caution - during the disassembly process, the contacts can be damaged or broken, and then the heating element will have to be changed.

Here is a good video on how to remove heating elements from an Indesit washing machine:
- Remove the wiring and chips from the electric motor. Take the knob and head 10mm to remove the 2 bolts that hold the motor. Remove the engine and set it aside.

- Switch to the top: above the top wall, you will see a large stone - the manufacturers called it a counterweight (it protects the machine from loosening). It is attached, as a rule, with 3 bolts. They can be removed with a socket wrench. After removing the counterweight, set it aside.

Important! The counterweight is very heavy - be careful not to drop or damage it.
You are now separated from the tank by just a couple of parts - for example, the control panel. To remove it, follow our recommendations:
- Unscrew the fasteners (they are located at the niche of the powder dispenser).
- Remove another mount that is hidden in the front left corner of the CM body.
- Pull up to release the block from the latches that hold it.
Important! Do not make sudden movements, otherwise you will cut off the wiring.
- Disconnect the wires that connect the panel to the intake valve.
- Set the part aside so that it does not interfere with you (hang it on a service hook, if you have one).
In the video, you will find more information on disassembling the front panel and removing the control panel:
Further disassembly
Now you need to access the tank from the front. To do this, work with the cuff:
- Find the clamp holding the sealing gum.
- Hook it up with a very thin screwdriver.
- Run the screwdriver in a circle until you hit the mount.
- Unscrew the mount.
- Remove the clamp.
- Tuck the elastic into the drum.

We disassemble the Indesit washing machine further:
- Walk around the machine.
- Unscrew the fastener near the water inlet hose.
- Now you can pull out two parts at once: the inlet valve and the niche of the detergent receiver.
Be careful! Disconnect the powder receptacle tube before removing the niche. To do this, open the clamp.

Important! The mount is made of plastic, so remove the sensor carefully so as not to break it.
- Lay the washer on its side.
- Since this brand usually does not have a bottom, you will immediately see the drain pipe and stands. The tank cannot be removed with these parts.
How to remove the branch pipe and stands:
- Loosen and remove the clamps holding the nipple.

- Pull off the nipple.
- Taking a 10 socket wrench, unscrew the fasteners that hold the racks.
- Remove the racks.
- Raise the clipper and put it in its original position.
The longest disassembly stage has been completed, you can safely proceed to the tank.
The trouble is that the manufacturer did not provide a collapsible tank, so it needs to be cut. To remove the tank, it is pulled off the springs and lifted up.
Important! When removing the tank, be careful not to break the wires or damage the cuff.

If you still have questions about sawing the tank, watch the video, which clearly shows the disassembly of the machine, and the sawing of the tank, and the replacement of bearings:
To remove the rear half of the tank, follow the instructions:
- Unscrew the nut that holds the drum pulley.
- Remove the pulley.
- Screw a suitable bolt into the thread (not from a typewriter).
- Lean a block of wood against the bolt.
- Hit the block with a hammer.
- A strong blow should move half of the tank.
When the remaining half of the tank is knocked down, you will have a drum, behind which a shaft sticks out, and seals and bearings are installed on it. Now you can remove them in one of the following ways:
- Find a special car puller.
- Take the drum to a workshop and ask the mechanics to remove the bearings. They usually do it quickly and easily for a nominal fee.
After removing the bearings, you can easily install new ones, and then reassemble everything. Assembly will be the same as disassembly, except for the tank.
It is impossible to "wash down" the tank back, but a good sealant will perfectly glue both halves. But even this is not enough - you will need to secure the tank with bolts.
If you understand how to disassemble the Indesit washing machine, then you can put both the tank and the whole machine back.

We disassemble and repair a front-loading washing machine
In a separate section taken out PHOTO LESSONS.
This article describes a method for disassembling the most typical front loading washing machine models. Let's take a Hansa car as an example ... Anyway, there may be some design differences in other models of washing machines, however, this manual can be used when repairing other models of front-loading washing machines.
Essential tool for disassembling an automatic washing machine.
1 One of the Phillips screwdrivers
2 Flat screwdriver
3 Wrench 19
4 8/9 wrench
5 Pliers 1472-Beta for self-clamping clamps, wire cutters
6 Simple pliers
7 Pliers
8 Long nose pliers

Service hook
We start disassembling the washing machine
Removing the top panel
To do this, use a Phillips screwdriver to unscrew the screws holding the top panel to the casing, as shown in the figure.

Lift the back of the panel with one hand, then slide the top panel with the other hand towards the rear wall before unhooking it.

Remove the top panel after it is unhooked
Dismantle the control panel
To do this, remove the detergent drawer as shown in the figure below.

After that, use a Phillips screwdriver to unscrew the screws that are designed to fix the detergent dispenser drawer to the front panel


Panel rotation 90 degrees

Detaching the panel from the pawl
Next, it will come in handy for usservice hook for turning the control panel 180 degrees and hanging the panel on the side wall of the automatic washing machine. For this we use a service hook. We insert the longer end into the hole of the retractable oyazh, and fix the shorter one on the side wall of the washing machine.

This is how it will look from above

This is how it looks from below.

And this is how it will look from the side
Removing the service panel
To do this, you must use a Phillips screwdriver. We unscrew the screws that fix the service panel to the two side walls of the washing machine.

Using a small crowbar, carefully separate the service panel. Please note that only plastic or wooden crowbars should be used to remove painted panels.


Using a flat screwdriver, remove the hatch door clamp, or more precisely, the front part. Then we manually unhook the cuff from the central panel of the washing machine as shown in the figures below.

After e we are filming center panel
To do this, we need a Phillips screwdriver, which needs to unscrew all 4 screws that fix the side walls of the washing machineand a center panel.

We dismantle the central panel together with the car window.


Use pliers to loosen the clamp on the hose that runs from the recirculation valve to the tank. Then we remove the hose from the distributor ( Jet - System ) as shown in the figure below.

Remove the clamp

After that, use pliers to loosen the clamp on the hose, which goes from the pressure switch container to the hose. Disconnect the hose from the pressure switch and remove the hose from the cuff of the washing machine door.

Remove the clamp

Disconnect the hose

Disconnect the hose from the cuff and remove it completely.
In order to remove the hatch cuff, loosen the screw cuffs on the tank using a Phillips screwdriver.

Loosen the screw cuffs on the tank
After that, it is necessary to remove the collar cuff from the tank using a flat screwdriver.

Remove the clamp from the tank
After these steps, it is necessary to unhook the hatch door cuff.

Removing the cuff from the drum
Reassembly
Reassembly should be done in the reverse order.
It should be remembered that during the reassembly of the machine, the door cuff must be fixed in such a way that the vertical axis of the washing machine coincides with the signΔ on the cuff. Make sure the drain groove is on the opposite side of this icon. It should be located at the very bottom of the cuff.
The screws of the cuff clamping clamps should be installed in such a way that their heads are flush with the free stud for installing the guy wires.

Cuff marker

We start repairing the car after disassembly
When replacing the V-belt, proceed as follows:
Remove the top panel, and then use pliers to remove the spring that supports the washing unit.

Remove the V-belt while turning it on the pulley at the same time

Installation of the reverse belt is carried out in the reverse order.
Note that the V-belt must be slipped over the roller so that one notch remains free at the end of the roller. How to do this is shown in the figure below.

Right fitted V-belt

Wrong fitted V-belt
The pulley is repaired as follows:
Remove the top panel, then unhook with pliers, disconnectwash unit spring and remove the V-belt. After that, it is necessary to unscrew the nut that fixes the pulley in the way shown in the figure below.

Unscrew the pulley nut
After that, we remove the pulley itself.

Pulley removal
We remove the heating element and the thermostat
To do this, you need to remove the service panel in the way described at the beginning of the article, then disconnect the wire from the heating element and unscrew the nut with which the heating element is fixed.

The heater is removed from the guide side. This should be done very carefully with those heating elements that are covered with a layer of scale. To install a new heating element, the same operations should be done in reverse order.
Changing the collector motor
First you need to dismantle the top panel assembly and then remove the service panel. Remove the V-belt and push back the screws that secure the engine.

We dismantle the engine itself.

Then disconnect the electrical connector from the motor as shown in the figure below.

After that, you should connect the new motor in the way indicated in the wiring diagram. All other steps for assembling the machine must be carried out in the reverse order, in accordance with this manual.
We repair a self-cleaning drain pump
Let's start by dismantling the service panel, then unscrew the screws that secure the pump with a Phillips screwdriver.

We loosen the clamps and remove the pump.

After that, you can disconnect all connectors, which should be done very carefully so as not to damage the wires.
The connection of the new pump and the reassembly of the machine are carried out in the reverse order.
Replacing the drain pump hose (drain tank)
We start by removing the service panel, then loosen the hose clamps and change the hose itself.

Replacing the drain pump hose (pump-recirculation valve)
Remove the service panel, loosen the hose clamps and change the hose.

We repair the detergent dispenser
We start by dismantling the toppanels, after which we take out the drawer and unscrew the screw that fixes the detergent assembly. It is located on the side of the control panel.

Detaching the detergent knot

Then we disconnect the hoses from the detergent assembly. After that, you can replace the faulty node.
We repair the anti-interference filter
Be sure to start the repair by disconnecting the power cord from the outlet, then remove the top panel and disconnect the power cord from the filter in the way shown in the figure below. Then we unscrew the screws that secure the filter.

The filter can then be removed from the hole and replaced.
We repair the inlet valve
Disconnect the power cord from the mains and shut off the water. Next, we disconnect the water supply hose from the machine itself and dismantle the top panel. After that, we disconnect the wires from the valve.

We remove the clamps from both hoses and remove them from the taps.

We unscrew the screw that fixes the tap.

Then you can replace it. Further operations for assembling the machine should be performed in the reverse order.
We repair the hatch of the washing machine

Repair option for a fully assembled washing machine
First, open the hatch as wide as possible, then unscrew both fixing screws, take out the hatch and change it.
We change the glass of the hatch of the washing machine
First you need to unscrew all 10 screws that secure the glass

Then you should disconnect the subassembly of the inner ring from the glass of the hatch.

Then you can start replacing the glass in the hatch.
We repair the outer ring of the washing machine hatch
As in the case of glass repair, you must unscrew the 10 screws with which the glass is attached to the hatch. Set the inner ring aside along with the glass and remove the hatch handle subassembly and hook assembly as shown in the figure.

After these procedures, we will replace the inner ring and assemble the hatch in the reverse order.
Change the inner ring
In the same way as in the two previous cases, we unscrew 10 screws thatdo not fix the window, detach the transparent elements of the inner ring, remove the hinge finger and the window hinge.

After these steps, you can replace the inner ring.
Change the hatch handle
We unscrew 10 screws that fix the window, remove and put aside the side of the hatch glass and the inner ring. Then we take out the handle subassembly and the hook knot. We take out the spring and 2 pins from the handle subassembly as shown in the figure.

After that, you can replace the hatch handle and reassemble the hatch in the reverse order.
Replacing the recirculation valve
We remove the service panel, disconnect the valve from the electric drive, remove the valve from the seat and disconnect three hoses from it.

After that, we change the valve and put everything back into the washing machine in the reverse order.
We change the rubber elements of the shock absorbers and the shock absorbers themselves
Change shock absorbers
In order to perform actions to replace a damaged shock absorber, it is necessary to remove the upper panel of the washing machine, remove the control panel and service panel.
Then you can remove the center panel and gain access to the power wires, which must be disconnected and pulled out of the casing. The wires should be disconnected from the solenoid valvea, heating element, pumps, recirculation valve and engine. all connectors are recommended to be signed.
Next, unscrew the screws that fix the upper bar and loosen the clamp on the hatch collar. Then you can remove the cuff from the center panel. Next, you need to unhook the electric drive harness from the hooks on the casing. Next, you need to unhook the spring that supports the washing unit and unscrew the screws that fix the casing to the base. Next, you need to remove the casing and disconnect all the hoses that are on the tank. It is necessary to raise the washing unit, released from the spring, so that the shock absorber pin pops out. Be sure to support the washing unit afterwards.
After all these steps, you can remove the shock absorber from the rubber tab at the base.

Remove the shock absorber rubber from the base.
Replace the shock absorber and reassemble the washing machine in the reverse order according to these instructions.
We repair the drum subassembly
We start by dismantling the top panel, after which we remove the control panel and service panel. Next, dismantle the central panel and disconnect the hoses on the tank.

After that, you need to unwind the front counterweight as shown in the figure below.

Halve the tank.

Unscrew the two screws and move them up a little.

Remove the V-belt from the shaft.

We turn off the pulley, which is attached to one nut.

After that we take out the drum subassembly.

It should be borne in mind that the drum units in a wide variety of types of washing machines may have different designs.
Failed to repair? Inexpensive repair of washing machines in St. Petersburg
Ask a question to the master - get advice on how to repair your washing machine yourself!
Do-it-yourself washing machine repair- more than 50 detailed PHOTO INSTRUCTIONS for self-repair.
To replace or repair the working parts of the lg washing machine, you need to get to them, that is, disassemble the device case. Most owners have difficulties when trying to remove the front panel, this review is devoted to the question of how to remove the front panel on the lg washing machine.
Disassembly involves several basic steps as well as some hand or power tools.
Stages
- Washing machine top cover;
- Lower part of the front panel;
- Control Panel;
- Electronic sensor of the car's hatch;
- The front panel itself;
Now let's take a closer look at each stage.
Lid
To free the top cover of the machine from the grooves, first unscrew the two self-tapping screws that fix it on the back wall. Depending on the model, the self-tapping screws can be with a Phillips head or an asterisk, respectively, to unscrew them you will need a different tool, a Phillips screwdriver or an asterisk key. After the fasteners are removed, the cover must be pulled towards you and lifted up, and then simply set aside.
Lower part of the front panel

Please note that there is a metal cover at the bottom of the front panel, on the right side of which there is a hatch, which provides access to the filter and pump of the device. The front panel fasteners are located under this cover, so it will have to be removed.
Under the hatch you will find several screws that need to be removed, after which the cover can be removed, it will take a little effort and possibly the help of a flat screwdriver. Pry the lower part with a screwdriver, this will release it from the fasteners, then you can easily remove it.
Control Panel

The electronic control panel of the LG washing machine is one of the most important parts of it, therefore, when removing this part, you must be as careful as possible. You will need a Phillips and flathead screwdrivers. The first step is to unscrew the screws that became accessible after you removed the top cover. Now you can start opening the plastic latches, this process will require accuracy and patience.

Using a flat screwdriver, carefully pry the plastic case of the control panel in the place where the latch holds it, do this along the entire length. Once you're done with the top clips, pull the panel up and back onto the clipper without damaging the cables or cables.

The door of the machine is equipped with a lock sensor, which prevents it from opening during washing. The sensor is connected to the door lock using special terminals; they can be disconnected by unscrewing the lock completely, or in the process of removing the front panel itself.
How to remove the front panel on a washing machineLg
Now you have access to all the fasteners holding the front panel of the car, these are the screws on the top, which were hidden under the dashboard and below. Once you unscrew all of them, this part of the case can be removed.